a1:guides:processing_deposits
This is an old revision of the document!
Table of Contents
Processing Deposits
Receiving Payments & Processing Deposits for AR Invoices in Successware 21
- Receive your payment just as you have always done in the past inside of Successware 21
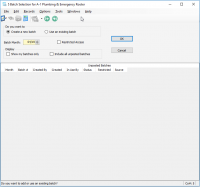
- A batch selection window will appear, if you want to continue working on one that was already in process then select from the list and click “OK”. However if you want to “Create a new batch” then make certain the toggle up top is selected accordingly and the proper Batch Month is selected, then click OK.

- In the “Action Column” Leave it as “A-Add”
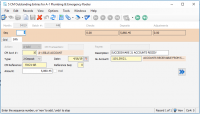
- “Tab” into the CM Acct#: field and enter “10”, then tab to the next field and it should have brought up the “A-1 Bills Account”
- In the “Type:” field hit “2” (Deposit) and tab to the next field
- In the date field enter “T” for today's date and “Tab” to move to the next field
- In the “CM Reference” field enter “SW21-AR” and “Tab” to move to the next field
- “Tab” through the “Reference Seq:” field which should fill in automatically with “0”
- In the Amount Field enter the total $ amount of the Successware 21 Deposit
- In the “Description field enter “SUCCESSWARE 21 ACCOUNTS RECEIV”
- Tab into the “GL Account” field and here you need to enter “1101.SW21 which should read “ACCOUNTS RECEIVABLE FROM SW21”
- Once you have entered this in you are now ready to “Post”
- To do this click “File” at the top left corner of the form, and select “Process Batch”
- This will pull up the “GL Batch Process” Window
- Click “Validate”
- Then under “Audit Reports” un-check the “Batch List” and make sure the “GL Account Distribution” one is checked, then click “Print” (Retain this copy to staple to your bank deposit slip & your Successware 21 Deposit report, once you return from making the deposit at the bank and file it.)
- Lastly verify the “Posting Date” is what you want and Click “Post”
Always make a separate Deposit for funds received and posted in Successware. And keep that separate bank deposit slip stapled to the GL Account Distribution report from Viewpoint and the Deposit detail report from Successware21. Never Combine the Deposits from AR Invoices from Successware, with the AR Invoices paid out of Viewpoint, at the bank thus making one grouped deposit.
Congratulations You have Successfully Posted your Deposit in Viewpoint for funds received in Successware 21!
Processing Payments & Deposits in Viewpoint
- A batch selection window will appear, if you want to continue working on one that was already in process then select from the list and click “OK”. However if you want to “Create a new batch” then make certain the toggle up top is selected accordingly and the proper Batch Month is selected, then click OK.

- Once the Form opens, hit “tab” on the key board twice, to begin entry of info into the Customer Box, start with F4 to pull up the search window, then enter the info and select the correct customer.
- Next hit “Tab” on the key board to move to the next field “Tans Date:” by default it will load in today's date.
- “Tab” again to move to the “Check” number field, enter if applicable.
- “Tab” enter the “Check Date”
- “Tab” enter the “Check Amount”
- “Tab” By default “CM Co” will load as “5” this is correct
- “Tab” By default “CM Account:” will load as “10” this is correct
- “Tab” to the “Deposit #:” field, and enter the Deposit # as today's date with no dashes, for example 04102019, that way each Deposit number is always unique and easily reference-able. If you need to enter more then one deposit(“Note-Deposit” this does not mean “checks” You want to list the same Deposit # on all the checks included in the same “batch”) in any given day then enter the next one as 04102019-2 and so on.
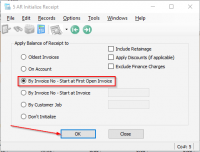
- This will open up a window called “AR Initialize Receipt” and by default it will select the last one you used, which in this case was “By Invoice No - Start at the First Open Invoice”. Generally this is correct, and you just hit “OK” However if that is not what you want, then select the one that would apply and hit “OK”. For example you may prefer to start at the “Oldest Invoices”

- By default it will apply the payments accordingly, and now you are ready to Save and enter “N” in the Sequence field to start another entry for the next check. Repeat steps 3-13 for each check
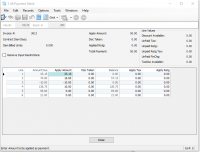
- Keep in mind that if you ever need to apply payment to specific lines on an invoice you can do that by clicking “Payment Detail” Button at the bottom of the form and this loads an “AR Payment Detail” Form which allows you choose/over ride which lines are being paid by this payment, and then hit “close”.

- Once you have entered in all the checks/Cash/Other payments for this deposit you are now ready to “Post”
- To do this click “File” at the top left corner of the form, and select “Process Batch”
- This will pull up the “AR Batch Process” Window
- Click “Validate”
- Then under “Audit Reports” un-check the “Batch List” & the “GL Account Distribution” and make sure the “CM Distribution” one is checked, then click “Print” (Retain this copy to staple to your bank deposit slip once you return from making the deposit at the bank and file it.)
- Lastly verify the “Posting Date” is what you want and Click “Post”
Congratulations You have Successfully Posted your Deposit in Viewpoint!
a1/guides/processing_deposits.1608826641.txt.gz · Last modified: 2020/12/24 08:17 by davek


